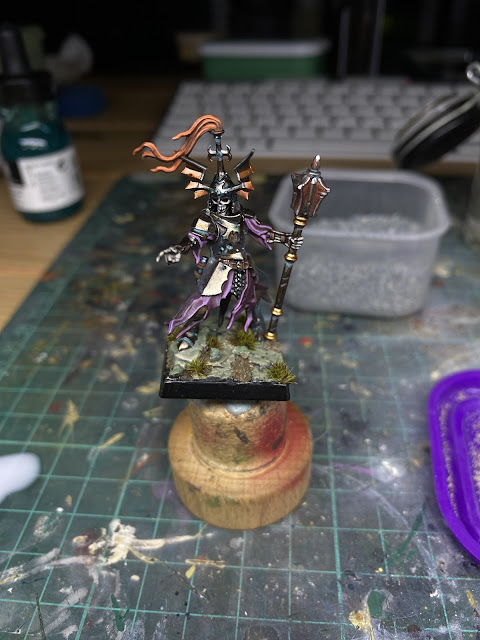
A very good friend has been dreaming of painting his Grave Guard for over fifteen years.
Fifteen years. Think about that.
So here’s a little help-a guide to break through that wall between vision and execution. If you're reading this, I hope you find it helpful. When you begin, try to remove all pressure from the process.
This guide is for him-and maybe for you too, if you've ever stood at the threshold of a long-awaited project, unsure how to begin. These Barrow Guard miniatures (from the newer Age of Sigmar range) carry the old soul of Warhammer's Grave Guard, but with more flow and energy. As someone who usually sides with old-school sculpts, I say this without hesitation: the new models are better.
So if you’ve been waiting to bring your Vampire Counts army to life, or you’re simply looking for a triadic colour scheme to paint a standout undead unit, this tutorial will guide you through every step-from the first basecoat to the final tuft of moss.
Paint Recipe & Materials for Warhammer Barrow Guard
Base Paints:
- Warplock Bronze
- Retributor Armour
- Screaming Bell
- Leadbelcher
- Hot Orange (Vallejo Game Color)
- Caledor Sky
- Rakarth Flesh
- German Green Beige WW2 (Vallejo)
- Luftwaffe Camo Green (Vallejo)
- Dark Fleshtone (Vallejo) – for base edge
- Ice Yellow (Vallejo)
Highlights & Layers:
- Sycorax Bronze
- Evil Sunz Scarlet
- Emperor's Children
- Vallejo Pink
- Pallid Wych Flesh
- Contrast "Voluptuous Pink"
- Vallejo Metallic Medium
- Washes, Inks & Effects:
- Liquitex Transparent Burnt Umber
- Liquitex Titanium White Ink
- Citadel Nihilakh Oxide
- AK Interactive European Earth pigment
Basing Materials:
- Gamers Grass Tiny Dark Moss tufts (2mm)
- Green Stuff
- Milliput White
- Gravel
Choosing a Triadic Colour Scheme for the Barrow Guard
Why this works:
- Strong contrast keeps the model visually interesting.
- No single tone dominates when used properly- but one should still lead.
Step-by-Step: How to Paint Your Barrow Guard Miniatures
1. Zenithal Priming
Create instant contrast and mood before you lay down colour.
Prime black.
Spray Titanium White Ink from above (approx. 60° angle).
2. Ancient Bronze Armour
Base: Warplock Bronze
Mid-tone: 50/50 Warplock Bronze + Retributor Armour
Edge Highlights: Sycorax Bronze
Final Highlights: Sycorax + White (just dot points)
Shade: Agrax Earthshade
Glaze Shadows: Transparent Burnt Umber
3. Helmet Plume
This element draws the eye and anchors your triadic contrast.
Base: 50% Hot Orange + 50% violet-red (75% Evil Sunz Scarlet + 25% Caledor Sky)
Highlight: Pure Hot Orange
Final Lights: 1:1 Ice Yellow + Liquitex Yellow Medium Azo
Spotlights: Ice Yellow
Shadow: Thin glaze of red-violet
4. Helmet Wings
The coppery wings work in tandem with the plume to add contrast and interest.
Base: Screaming Bell
Shadow: Burnt Amber + Black (glaze)
5. Robes – The Tattered Regal
The Grave Guard once served lords. Their robes should whisper of that.
Base: 75% Red + 25% Blue
Highlights: Vallejo Pink
Second Light: Emperor’s Children
Shadow: Blue glaze
Midtone Refresh: Contrast “Voluptuous Pink”
6. Rusted Iron & Bladework
Base: Black + Leadbelcher
Lights: Pure Leadbelcher
Edge Highlights: Vallejo Metallic Medium
Shadows: Black lining
Rust tones: Vallejo Red Black, stipple with Evil Sunz Scarlet + Hot Orange
Oxidation: Nihilakh Oxide in recesses
Rust Deposits: AK Interactive Light Rust pigment
7. Basing – Forgotten Entrance to the Barrow
Use texture to tell a story. These warriors walk across memories. The faded stone beneath them reflects the passing of time.
Sculpt a Forgotten Tomb Base:
Mix 50% Green Stuff + 50% Milliput White
Flatten and carve cobblestones with a hobby knife
Texture edges to suggest erosion
Add gravel and moss tufts to blend into the base
Base Layer: German Green Beige + Luftwaffe Camo Green
Highlights: Rakarth Flesh or Pallid Wych Flesh
Tufts: Gamers Grass Tiny Dark Moss
Dusting: European Earth pigment
Base Edge: Black
Final Result and Thoughts:
The dead don’t dream...but we do. And sometimes, finishing a long-held project is how we honour that dream.
If you paint yours, tag me on Instagram or share a link in the comments. I’d love to see what you've done.


Haven't seen your paintjobs before - these are striking!!! O_o
ReplyDeleteAce job with the barrow guard! 💀
Thanks Demi ! I’m really glad you liked him. I genuinely admire the work you put into your blog- it shows a lot of creativity.
ReplyDeleteAwww... 🤗😉
ReplyDelete