06/07/2025

Painting the Barrow Guard-Step by Step Guide


A very good friend has been dreaming of painting his Grave Guard for over fifteen years.

Fifteen years. Think about that.


So here’s a little help-a guide to break through that wall between vision and execution. If you're reading this, I hope you find it helpful. When you begin, try to remove all pressure from the process.


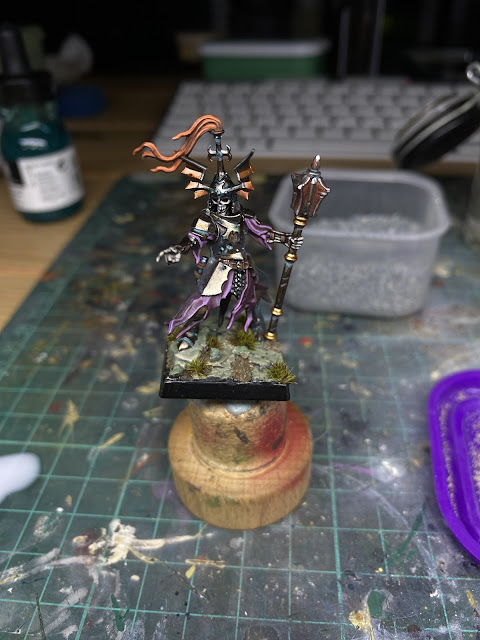
This guide is for him-and maybe for you too, if you've ever stood at the threshold of a long-awaited project, unsure how to begin. These Barrow Guard miniatures (from the newer Age of Sigmar range) carry the old soul of Warhammer's Grave Guard, but with more flow and energy. As someone who usually sides with old-school sculpts, I say this without hesitation: the new models are better.


So if you’ve been waiting to bring your Vampire Counts army to life, or you’re simply looking for a triadic colour scheme to paint a standout undead unit, this tutorial will guide you through every step-from the first basecoat to the final tuft of moss.


Paint Recipe & Materials for Warhammer Barrow Guard

Base Paints:

  1. Warplock Bronze
  2. Retributor Armour
  3. Screaming Bell
  4. Leadbelcher
  5. Hot Orange (Vallejo Game Color)
  6. Caledor Sky
  7. Rakarth Flesh
  8. German Green Beige WW2 (Vallejo)
  9. Luftwaffe Camo Green (Vallejo)
  10. Dark Fleshtone (Vallejo) – for base edge
  11. Ice Yellow (Vallejo)

Highlights & Layers:

  1. Sycorax Bronze
  2. Evil Sunz Scarlet
  3. Emperor's Children
  4. Vallejo Pink
  5. Pallid Wych Flesh
  6. Contrast "Voluptuous Pink"
  7. Vallejo Metallic Medium
  8. Washes, Inks & Effects:
  9. Liquitex Transparent Burnt Umber
  10. Liquitex Titanium White Ink
  11. Citadel Nihilakh Oxide
  12. AK Interactive European Earth pigment

Basing Materials:

  1. Gamers Grass Tiny Dark Moss tufts (2mm)
  2. Green Stuff
  3. Milliput White
  4. Gravel


Choosing a Triadic Colour Scheme for the Barrow Guard

This project uses a triadic colour palette:
Violet – Yellow-Orange – Blue-Green

These colours form a triangle on the colour wheel, offering vibrant contrast without chaos. By allowing Violet to lead, and using Orange and Blue-Green as support, the scheme feels lively yet grounded .


Why this works:

  • Strong contrast keeps the model visually interesting.
  • No single tone dominates when used properly- but one should still lead.


Step-by-Step: How to Paint Your Barrow Guard Miniatures

1. Zenithal Priming

Create instant contrast and mood before you lay down colour.

Prime black.

Spray Titanium White Ink from above (approx. 60° angle).

Focus highlights on upper surfaces. Leave lower areas dark.
The translucent nature of acrylics will do some of the heavy lifting for you.


2. Ancient Bronze Armour

Base: Warplock Bronze

Mid-tone: 50/50 Warplock Bronze + Retributor Armour

Edge Highlights: Sycorax Bronze

Final Highlights: Sycorax + White (just dot points)

Shade: Agrax Earthshade

Glaze Shadows: Transparent Burnt Umber


3. Helmet Plume

This element draws the eye and anchors your triadic contrast.

Base: 50% Hot Orange + 50% violet-red (75% Evil Sunz Scarlet + 25% Caledor Sky)

Highlight: Pure Hot Orange

Final Lights: 1:1 Ice Yellow + Liquitex Yellow Medium Azo

Spotlights: Ice Yellow

Shadow: Thin glaze of red-violet


4. Helmet Wings

The coppery wings work in tandem with the plume to add contrast and interest.

Base: Screaming Bell

Shadow: Burnt Amber + Black (glaze)

Highlights: Retributor Armour + Ice Yellow
(Don’t overdo it — Screaming Bell is a beautiful tone, and you want it to show.)


5. Robes – The Tattered Regal

The Grave Guard once served lords. Their robes should whisper of that.

Base: 75% Red + 25% Blue

Highlights: Vallejo Pink

Second Light: Emperor’s Children

Shadow: Blue glaze

Midtone Refresh: Contrast “Voluptuous Pink”


6. Rusted Iron & Bladework

Base: Black + Leadbelcher

Lights: Pure Leadbelcher

Edge Highlights: Vallejo Metallic Medium

Shadows: Black lining

Rust tones: Vallejo Red Black, stipple with Evil Sunz Scarlet + Hot Orange

Oxidation: Nihilakh Oxide in recesses

Rust Deposits: AK Interactive Light Rust pigment


7. Basing – Forgotten Entrance to the Barrow

Use texture to tell a story. These warriors walk across memories. The faded stone beneath them reflects the passing of time.

Sculpt a Forgotten Tomb Base:


Mix 50% Green Stuff + 50% Milliput White

Flatten and carve cobblestones with a hobby knife

Texture edges to suggest erosion

Add gravel and moss tufts to blend into the base


Step-by-step images showing how to sculpt an aged stone base for miniatures using modeling putty, including spreading the putty, carving tile lines, adding cracks and texture to mimic weathered stone, and applying debris for a worn, ancient effect.


Painting the base:

Base Layer: German Green Beige + Luftwaffe Camo Green

Highlights: Rakarth Flesh or Pallid Wych Flesh

Tufts: Gamers Grass Tiny Dark Moss

Dusting: European Earth pigment

Base Edge: Black


Final Result and Thoughts:


The dead don’t dream...but we do. And sometimes, finishing a long-held project is how we honour that dream.

If you paint yours, tag me on Instagram or share a link in the comments. I’d love to see what you've done.

Best Regards

Gimnir

21/04/2024

Volkmar the Grim - Warhammer’s Most Iconic Warrior Priest


Volkmar the Grim with his war gear leading the troops


Greetings, fellow enthusiasts and miniature aficionados! Today, I have a tale to share with you, featuring the legendary Volkmar the Grim mounted on a war altar of Sigmar. 


Let me begin by saying that Volkmar the Grim is not your average guy, he is the embodiment of faith, a man who swore to vanquish chaos in all its forms. And as for the miniature itself? It is a behemoth that would give any civil engineer nightmares!


Sigmar griffon defying the rules of gravity on the altar's roof

There is an overwhelming amount of intricate details adorning this monstrosity. Shields, swords, knives, parchments, and yes, you guessed it, an impressive surplus of skulls.


Amount of detail in just one wheel (only shows one side)

Now, you may be wondering how I ended up with such a magnificent treasure. Well, dear readers, it all started with a bet with a dear friend, as many memorable stories do-If I lost the bet then I would paint Volkmar and the War Altar of Sigmar for him. Unfortunately, luck was not on my side, and I found myself on the losing end. Honouring the code of honour between friends, I embarked on the daunting task of painting this colossal beast for my thrilled friend.


Let me assure you that this was no ordinary painting endeavour—it was a test of skill and endurance that almost shattered my very willpower. Stroke by stroke, I painstakingly worked to bring out the true essence of Volkmar the Grim, all while trying not to lose my sanity. It was a labor of love, a testament to the unbreakable bond shared between friends.


One out of several pages breaking down the miniature into actionable points in my attempt to not lose my mind in the process


As all good stories must, this chapter draws to a close. The miniature has bid adieu to my humble abode, finding sanctuary amidst friend's collection. 


Warrior Priest of Sigmar covering Volkmar's back

Until next time, may your brushes be steady, your dice be kind, and your victories be sweet.


Best regards


10/03/2024

Warhammer Night Goblins.


Hey there, fellow Warhammer enthusiasts! 


Welcome back to the wild world of my Warhammer Fantasy Orcs and Goblins army. Today, I'm thrilled to tell you about the journey behind my latest update to the Goblin Diaries


So, rewind the clock—23 years ago, to be exact. I stumbled upon some vintage Night Goblins sculpted by the masterminds Brian Nelson and Aly Morrison for Warhammer Fantasy Battles 6th Edition in the year 2000. 


Despite the lack of fine detail, these little guys oozed personality, especially  their mischievous faces. And thus, the inspiration for my latest project was born!


The mission? Transform these night goblins into a unit that's downright unique. I've always admired armies with a touch of whimsy and a dash of silly, and who better to embrace that spirit than our beloved night goblins?


As chronicled in the "Goblin Diaries" , I crafted a narrative for the army that involved the night goblins invading and ransacking a Border Princes city during festivities (See Chapter II). 


To add some flair and to allow me telling the tale visually, I created a 5x3 base filler inspired by a platform I spotted during  a chilly winter walk in the South of London.

Real life bird spotting platform that inspired the filler

 
Building the podium was an absolute blast, and let me tell you, ensuring it was structurally sound added an extra layer of excitement. But the real challenge? Sculpting and positioning a vomiting goblin seamlessly with the one on the lower level—because, you know, we didn't want any mishaps during painting! Sculpting something like this that would allow me painting all sides without breaking in the process was a real challenge.

The vomiting Night Goblin and the Night Goblin shielding from the acid rain are one piece-a real challenge to sculpt


To represent some weathering  I used some inspiration in another one of my walks where I saw some moss growing in an ordinary house fence: inspiration can hit anytime, anywhere!


Moss growing at the base of a garden fence


With the filler complete, it was time to get down and dirty with 15 more goblins. Each one infused with its own personality and a hint of narrative. From a goblin enjoying some pipe weed and a scavenged rusty balustrade weapon to the flatulent music on the front—these little green guys were ready to party!


All the goblins in the unit are converted to be unique, spot the differences!


And let's not forget the goblin challenging the gang to a drinking contest. It's an eclectic bunch that truly captures the essence of goblin chaos. 


Night Goblin Chaos


Finished unit and Night Goblin "music" at the front

Stay tuned for more tales from the Goblin Diaries- I am pretty sure more silliness will follow.


Until next time, may your brushes be steady, your dice be kind, and your victories be sweet.


Best regards


25/02/2024

Elven Prince on Lion


Greetings, fellow painters!
 
Finished some time ago for a generous patron, this piece holds a special place in my heart, and today, I'm thrilled to share the story behind it.

The journey began when the patron approached me with a desire for a miniature that could capture the magical essence of high elves. Intrigued and eager for a creative challenge, I accepted the task.
What made this project even more enchanting was the patron's willingness to grant me almost total freedom in the creative process. Collaborating with someone who not only trusted my skills but also allowed our visions to seamlessly blend was a breath of fresh air. The result? Well, judge for yourself as you continue reading.

Some of the Artwork sent by the client as a reference (Artist unknown)


When the proposed miniature turned out to be the Elven Prince on Lion by Last Sword Miniatures, my miniature-loving heart skipped a beat.
 
The resin print from Last Sword Miniatures was excellent

Now, let's address the tricky part of commission painting – a terrain familiar to many artists. While having someone invest in your artistic skills is undoubtedly validating, I've learned that not every commission sparks joy. In the early days, I found myself tackling every project that came my way, be it sci-fi warriors or a space marines. However, the thrill wasn't always there, and some miniatures felt as exciting as watching paint dry (pun intended).
 
And oh, the ubiquitous space marines – those identical, armoured souls. How many of them can one person paint before questioning their sanity? It was a question I grappled with until I decided that life's too short to be stuck painting something you're not passionate about.
 
Back to our high elf Prince and his White Lion. The Lion, with its humanoid-like arms , offered an easier interpretation of volumes.

You can see in the photo how the anatomy of the lion is slightly "Human"


Choosing the resin version from the Last Sword Miniatures shop turned out to be a brilliant decision. The quality exceeded expectations, and the customer service was nothing short of outstanding.

To capture the magical essence of the high elf Prince and his white lion, I decided to infuse the miniature with an ambiance reminiscent of snow, opting for a cold palette and a harmonious color scheme. 


The color palette waltzed with reds, yellows, blues, and whites, creating a desaturated yet harmonious scheme. Black took a backseat as I played with colours to conjure the darkest tones, resulting in a desaturated scheme with richly coloured greys.


In this Macro you can see some of the print layers

Close up of the elf's face and NMM


Until next time, may your brushes be steady, your dice be kind, and your victories be sweet.
 
Best regards.

11/02/2024

TUTORIAL: How to paint yellow in 8 Easy Steps


Greetings! Today, I'm thrilled to share with you a quick tutorial on how to paint yellow. 

Now, before we dive into in, let me throw in a quick disclaimer – there are numerous ways to achieve a yellow hue, and what I'm about to reveal is just one of the many chromatic variations out there. But hey, if you're a fan of the yellow on my Warhammer Night Goblin Banner, then buckle up because here comes the methodology!


MATERIALS 


Let's start by gathering our artistic arsenal:


- Citadel Chaos Black primer

- Liquitex Titanium White acrylic ink

- Vallejo Bright Orange 70.851

- Vallejo Deep Yellow 70.915

- Vallejo Ice Yellow 70.858

- Vallejo Gold Brown 70.877

- Citadel Gore-Grunta Contrast

- Golden Artist Colours Titanium White


For the application process, you'll need some additional materials (check out my essential materials blog post for more info if you need to), assuming you've already got them handy.


8 EASY STEPS TO PAINTING YELLOW


Step 1: Begin by applying the Citadel Chaos Black primer to your miniature .


Step 2: Highlight the miniature with Liquitex Titanium White ink to create that zenithal lighting effect. This step is key as it sets the stage for the brilliance to show in the next steps.


Step 3:  Apply Vallejo Bright Orange to the areas covered with the previously applied white. The white base acts as a canvas, intensifying the saturation and brightness of the orange.


Step 4: Apply a 50% mix of Bright Orange and Deep Yellow.


Step 5: Apply Deep Yellow with precision, avoiding coverage of the layers from steps 3 and 4. We're building layers here, people!


Step 6: Mix 75% Deep Yellow with 25% Ice Yellow and apply in controlled areas where the light shines most brilliantly. Think that these areas are usually perpendicular to the light source.


Step 7: Utilize a mix of Bright Orange and Gore-Grunta Contrast in areas revealing the black primer, adding depth and contrast.


Step 8: Finishing touches:. Apply Golden Acrylics Titanium White to the highest points of light, such as the moon tips, nose, and selected areas in the eye wrinkles. For the pièce de résistance, simulate reflection rays in the maximum shadow areas using a desaturated yellow (Vallejo Gold Brown).


And there you have it – an easy way of painting yellow! 


Until next time, may your brushes be steady, your dice be kind, and your victories be sweet.


Best regards